Introduction to the Ultimate Apple Pie
The apple pie stands as an iconic symbol in the world of desserts, cherished across generations for its comforting flavors and timeless appeal. A staple in many households, this classic treat captures the essence of tradition, evoking memories of family gatherings and holiday celebrations. The ultimate apple pie is more than just a dessert; it represents a fusion of sweet and tart flavors housed within a perfectly baked crust, promising a delightful experience for all who indulge in it.
Our carefully crafted recipe aims to demystify the process of making an apple pie, ensuring it is accessible to bakers of all skill levels. Whether you are a seasoned pastry chef or a novice in the kitchen, this guide is designed to lead you through each step with ease and confidence. The simplicity of this recipe lies in its straightforward instructions and readily available ingredients, making it an ideal choice for anyone seeking to create a delicious and memorable dessert.
The appeal of the ultimate apple pie transcends its simplicity. Its rich aroma, inviting appearance, and the harmonious blend of textures and flavors make it an irresistible treat. This recipe promises not only a mouth-watering pie but also a rewarding baking experience. As you follow along, you’ll discover the joy of transforming fresh apples into a beautifully golden pie that is sure to impress both family and friends.
In the following sections, we will delve deeper into the specific ingredients and techniques required to bake this ultimate apple pie. With meticulous attention to detail and a focus on achieving the perfect balance of flavors, this guide will provide you with all the tools and tips needed to succeed. Get ready to embark on a culinary journey that celebrates the art of pie-making, and delight in the satisfying results of your efforts.
Ingredients You’ll Need
Baking an exceptional apple pie begins with selecting the right ingredients. For the best results, focus on fresh, high-quality items. To start, you’ll need approximately six to eight cups of peeled, cored, and thinly sliced apples. Opt for a mix of tart and sweet varieties such as Granny Smith, Honeycrisp, or Golden Delicious. This blend will offer a balanced flavor and texture to your pie.
The next crucial ingredient is flour. You’ll need about two and a half cups of all-purpose flour for the crust, plus a little extra for dusting. To achieve a flaky, tender crust, ensure your flour is fresh and sifted. Additionally, you’ll require half a teaspoon of salt, three tablespoons of granulated sugar, and one cup of unsalted butter, cut into small cubes and chilled. The cold butter creates pockets of steam during baking, resulting in an airy, flaky texture.
For the filling, one cup of granulated sugar will sweeten the apple mixture perfectly. You can adjust this quantity based on the sweetness of your apples. To enhance the flavor profile, add one teaspoon of ground cinnamon and a quarter teaspoon of ground nutmeg. These spices provide warmth and depth, elevating the overall taste of your pie. A pinch of ground cloves and a tablespoon of lemon juice will add a subtle, bright note.
Don’t forget the thickening agents: three tablespoons of all-purpose flour, corn starch, or instant tapioca work well to absorb excess liquid released by the apples during baking, preventing a soggy crust. Finally, prepare one large egg beaten with one tablespoon of water for an egg wash, which gives your pie a beautiful, golden-brown finish.
By using premium, fresh ingredients and following these guidelines, you’ll set a solid foundation for creating an unforgettable apple pie.
Preparing the Pie Crust
The foundation of any great apple pie lies in its crust, and making it from scratch can make a substantial difference to the ultimate outcome. To achieve a flaky, tender crust that will enhance the apple filling, start with high-quality ingredients. Begin by measuring out your flour, ensuring it is sifted to avoid any lumps, which can result in a dense crust.
Cold butter is key to a successful homemade pie crust. Cut the butter into small cubes and keep it chilled until you’re ready to incorporate it into the flour. This step ensures that the butter remains solid, which helps create those desired flaky layers. Use a pastry cutter or your fingertips to combine the cold butter with the flour until the mixture resembles coarse crumbs. Avoid using your palms, as the warmth can melt the butter prematurely.
Next, incorporate ice water, adding it gradually until the dough starts to come together. The amount needed can vary, so it’s important to add it slowly. Once the dough holds its shape when pressed together, shape it into a disc, wrap it in plastic wrap, and refrigerate it for at least an hour. Chilling the dough is crucial as it allows the gluten to relax and the butter to firm up once more, which facilitates a more manageable rolling process.
If you’re short on time or prefer a more convenient option, a store-bought crust can serve as an adequate substitute. Look for pre-made dough that uses real butter or consider puff pastry for a different texture experience. Be sure to follow the package instructions for any necessary preparations like thawing or rolling out the dough.
By taking these steps, you’re ensuring that your apple pie crust will be both structurally sound and delightfully flavorful, providing the perfect base for your filling. Whether you choose to make the crust from scratch or opt for a ready-made version, paying attention to the details will yield a pie that’s as pleasing in appearance as it is in taste.
Making the Apple Filling
The secret to an exceptional apple pie lies in the quality and preparation of the apple filling. Begin by selecting fresh, crisp apples, such as Granny Smith or Honeycrisp, which offer a balanced blend of tartness and sweetness. Peel the apples meticulously, using a sharp peeler to remove only the skin while retaining as much fruit as possible. Next, proceed to slice the apples evenly, aiming for a thickness of about 1/4 inch. Uniform slices ensure that the apples cook consistently, providing a perfect texture in every bite of your apple pie.
Mix the apple slices in a large bowl with granulated sugar, brown sugar, and a medley of spices to elevate the flavor profile. Cinnamon and nutmeg are quintessential choices, lending warmth and depth to the filling. For an extra layer of complexity, consider incorporating a pinch of allspice or cloves. Balance the sweetness and spices with a hint of acidity by adding a tablespoon of freshly squeezed lemon juice. This not only enhances the flavors but also prevents the apples from oxidizing and browning prematurely.
Many bakers opt to pre-cook the apples to ensure a consistent and tender filling. To do this, sauté the apple mixture over medium heat for about 10 minutes, until the apples begin to soften but still retain some crunch. This step helps in controlling the moisture content, reducing the risk of a soggy pie crust. If pre-cooking, allow the apples to cool before filling the pie shell to maintain the dough’s integrity.
Whether you choose to pre-cook or go directly with raw apples, this meticulous apple preparation will result in a sumptuous filling that is both flavorful and perfectly textured, setting the foundation for an extraordinary apple pie.
Assembling the Pie
Assembling the ultimate apple pie begins with properly layering the apples in the prepared pie crust. Ensure you arrange the apple slices evenly across the base, which helps in uniform cooking and flavor distribution. As you layer the apples, sprinkle a mixture of sugar, spices, and a bit of flour between the layers to absorb excess juices and intensify the taste. Providing a consistent layering process not only enhances the pie’s structure but also its overall flavor profile.
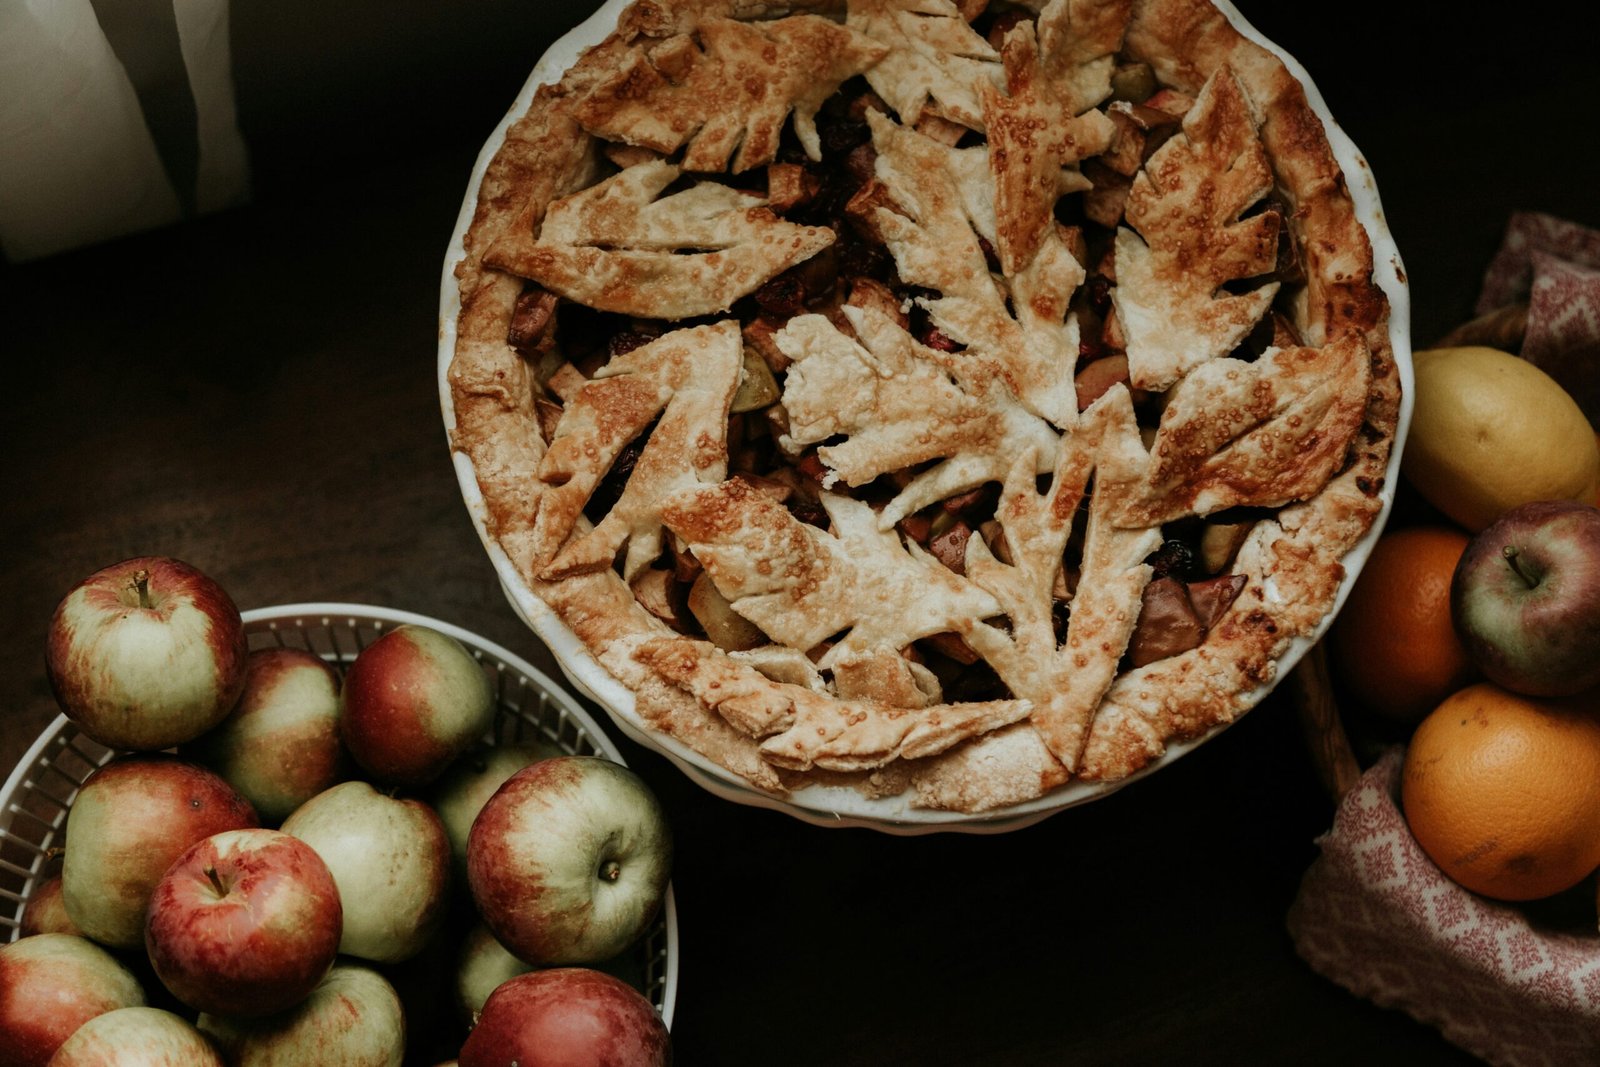
Once the apple filling is well-layered, you’ll need to add dabs of butter across the top before placing the top crust. The butter enriches the filling, creating a luscious, silky texture after baking. For the top crust, you have the option to use a solid sheet, lattice, or other creative designs. If opting for a lattice or cut-out design, it naturally creates vents for steam to escape. However, if using a solid sheet, make sure to cut small slits or a decorative pattern as vents. Proper venting is crucial to prevent the pie from becoming soggy and ensures a beautiful, golden finish.
Sealing the edges of the pie is the next critical step. Techniques such as crimping with a fork or pinching the dough between your fingers not only seal the pie but also add an elegant touch. Some bakers prefer using a decorative fluted edge, achieved by pressing the dough between their thumb and forefinger. Whichever method you choose, ensure it creates a tight seal to keep the filling inside and maintain the pie’s shape during baking.
With the pie fully assembled, it’s now ready to be baked to perfection. Following these steps will ensure your apple pie is not only visually appealing but also an ultimate delight in taste and texture.
Baking to Perfection
To bake the ultimate apple pie, precision in the baking process is critical. One of the first steps is preheating your oven. Set it to 425°F (220°C) and allow it to reach the temperature before you place your pie inside. Proper preheating ensures that the baking process begins immediately, which is key to achieving a properly cooked crust and filling.
The baking time for an apple pie typically ranges between 45 to 55 minutes. Halfway through baking, you might need to lower the temperature to 375°F (190°C) to ensure the pie bakes evenly without burning the edges. Maintaining this temperature balance allows the filling to cook thoroughly while the crust turns a perfect golden brown.
Checking for doneness is another vital step. When the pie is nearly finished baking, look for bubbles in the filling that slowly pop through the steam vents. This indicates the filling has thickened and is cooked completely. You can also insert a knife or a skewer into the pie; it should slide easily through the apples, confirming they are tender.
One of the common challenges while baking an apple pie is the risk of the crust burning before the filling is cooked. To avoid this, use a pie shield or strips of aluminum foil to cover the edge of your pie crust about halfway through baking. This practice helps protect the crust from excessive browning while allowing the rest of the pie to bake evenly.
A beautiful, golden-brown crust is the hallmark of a perfectly baked apple pie. Brush the top crust with a beaten egg or milk, and sprinkle a little sugar just before baking. This step not only enhances the flavor but also gives the crust a beautiful sheen and an inviting, crisp texture.
Serving Suggestions
To elevate the experience of enjoying an apple pie, consider pairing your freshly-baked delight with a scoop of creamy vanilla ice cream. The contrast between the warm pie and the cold ice cream creates a delightful harmony of textures and flavors, enhancing the overall indulgence.
Another classic yet luxurious option is to top each slice with a dollop of freshly whipped cream. The airy, smooth cream complements the richness of the apple filling and the crispiness of the pie crust, creating a balanced and mouthwatering experience. If you prefer a savory twist, a thin slice of sharp cheddar cheese placed on top of a warm apple pie can be a game-changer, offering an unexpected but delightful contrast of sweet and savory flavors.
When it comes to cutting and serving the apple pie, using a sharp, serrated knife will help you achieve clean, precise slices. Carefully wipe the knife between cuts to prevent filling from sticking and spoiling the shape of your slices. For an impeccable presentation, serve each slice with a decorative drizzle of caramel sauce around the plate or a dusting of powdered sugar over the pie.
If you’re entertaining guests or simply want to add a touch of elegance to your meal, consider presenting the pie on a cake stand or a beautifully garnished platter. Adorning the pie with a sprig of mint or a few fresh apple slices adds a touch of freshness and vibrancy, making your apple pie not only a treat for the taste buds but also a feast for the eyes.
Storing and Reheating Leftovers
Proper storage is crucial to maintaining the freshness of your apple pie and ensuring that each slice remains as delightful as the first. To store leftover apple pie effectively, start by allowing the pie to cool completely. This prevents condensation from forming inside the storage container, which can lead to a soggy crust.
If you plan to consume the pie within a couple of days, refrigerating is the optimal choice. Wrap the pie or individual slices tightly in aluminum foil or plastic wrap, or use an airtight container. This not only preserves the flavor and texture but also protects it from absorbing any odors from the fridge. Your apple pie can be kept refrigerated for up to four days.
For longer storage, freezing is another excellent option. To freeze your pie, first, ensure it is completely cool. Then, wrap it tightly in plastic wrap and place it in a heavy-duty freezer bag or wrap it again in aluminum foil. This double-layer of protection helps to keep the pie from freezer burn. It is recommended to consume frozen pie within two to three months for optimal taste and texture.
When it comes to reheating, the goal is to restore the pie to its just-baked warmth and crispness. If reheating from the refrigerator, preheat your oven to 350°F (175°C). Place the pie or slices on a baking sheet and heat for 10-15 minutes, checking periodically. To avoid over-browning the crust, you can tent the pie with aluminum foil. If reheating from frozen, thaw the pie overnight in the refrigerator before following the same reheating instructions.
For a quick reheating option, the microwave can be used, though it may slightly alter the texture of the crust. Place a slice on a microwave-safe plate and heat on medium power for about 30-60 seconds. To maintain better crust quality, consider using a microwave crisper tray.
By following these storage and reheating strategies, you ensure that your leftover apple pie remains as scrumptious as when it was first baked, delighting your taste buds with each bite.


